The DIY Experience
- wrightkatiekrw
- Dec 4, 2022
- 4 min read
DIY: Do it Yourself - this craze has always been around but during COVID and for a couple years prior, the popularity skyrocketed and many individuals took it upon themselves to do projects in hopes on monetary and time savings. Ultimately, those two reasons are why John and I are DIY'ing Wallpaper Acres. We have seen how time gets put to the wayside when using a contractor and how quickly the bills add up when using a designer. So in hopes, John and I set out on this major DIY project.
This week's updates trend directly in line with savings by doing it ourselves and updating features that the house had. On Saturday, we started our day by going to Habitat to donate our old light fixtures. While there, we stumbled upon iron balusters for the stairway at a 75% savings. Are we planning to do this project soon, no. However, we know that we will need these so we went ahead and purchased these and will store them until we need them.
The big project for the weekend was cleaning, sanding, priming, and painting all interior doors. Now this project should be quick but the time and prep that goes into this process is a lot. During the week, John and I worked on prepping the living room to become a makeshift paint booth for all of our upcoming paint projects. The first use of the paint booth was the doors. John saw a really cool way to line up all the doors accordion-style with a piece of wood screwed into to them along the top to serve as support. This would allow us to line up ALL the interior doors and paint them in one go.
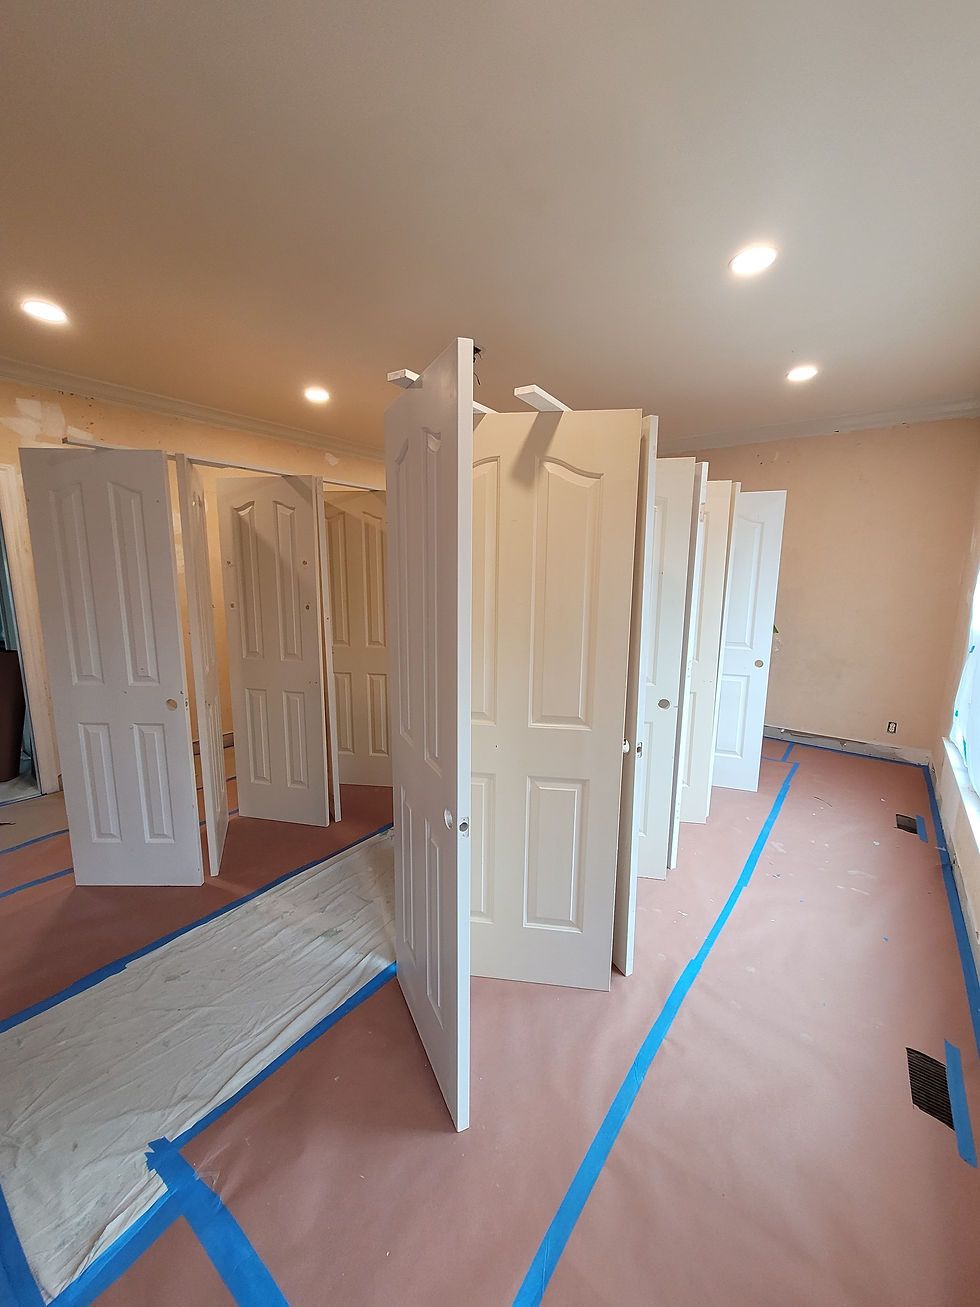

I had already removed the doors a month ago and cleaned them up. However, these doors were very poorly maintained and had very sticky "command strips from hell" (direct quote from John - they are actually called adhesive screws) and a lot screw holes. Some doors were also painted terribly and had plenty of brush strokes as John believes that the previous owners used a broom to paint, that is how bad they looked. The process to remove the adhesive screws took me roughly an hour and there were only 8 to remove...but each one had to sanded then chiseled and repeat 5-7 times until it was removed...what fun! John worked on sanding down the other doors and filling screw holes to prepare for paint. All this to say, we would have LOVED to buy new doors, but we do not have $3,000-$5,000 extra dollars laying around so it was up to us to fix the ones we had...hence DIY! Once the doors were ready, John applied the primer. While we waited for the primer to dry, John and I turned our focus to upstairs and he worked on replacing outlets and I touched up where the paint meets the baseboards. Once we determined that the doors would not be dry in a reasonable time, we called it a day.
When we got back to East Nashville, we had a package on our front porch. The other area of savings for the weekend...Blinds, well in our case, cellular shades. A couple of weeks back, I had a blind company come out and quote us for blinds for the upstairs rooms and let me tell you...sticker shock was real! So much so that I believe the blind industry is highway robbery!!! Thus, John and I decided to , you guessed it, DIY our blind situation. We ordered them online from Blinds.com and had a very good experience. Fast forward to Saturday night, the 2 "test" blinds we ordered were in. We opened them up and they looked very nice and appeared to be quality material. The first thing we did when we got to the house on Sunday were to hang the cellular shades and the install took us 5 minutes a window and we are ecstatic with how they turned out. The best part...by ordering online and DIY'ing it, we saved 40% per window then if we had gone with the blind company. That coupled with the quick turnaround time, the decision for us to do it was a no brainer! We will be ordering the remaining window treatments closer to moving in.


Next, we turned our attention to painting the doors our trim color. The primer adhered very well and we were ready to paint.

The whole paint process took 20 minutes and the doors were ready to dry! The before and after of these doors is remarkable! From old & yellowed, they are now looking pretty close to new for the price of elbow grease and paint! Not much else that we could do to be happier and they look great! The goal for this weekend was to get the doors painted and that was accomplished!


Thanks for continually reading the blogs and following along on our journey at Wallpaper Acres! In case you are curious about the condition I write the blogs in, peep the picture below! See you next week!


Comments